

In 2026, around 1.2 million websites are currently built with Divi. But with the launch of Divi 5, the interface and features of the DiVi dashboard have upgraded a lot.
The new Divi 5 introduces one click editing, advanced CSS units, global design variables, with 50% lower memory usage and up to 30% faster load times compared to DiVi 4. These make designing a professional website even faster, smoother, and more efficient.
In this blog, we’ll show you how to create a website with Divi 5, from installing the theme to publishing a fully responsive, professional site. We’ll cover both ways to build your DiVi website:
- Manual creation from scratch
- Using DiVi pre-built templates or AI tools
So, let’s start creating our DiVi 5 website.
Prerequisites: 3 Things You Need Before Building a Divi Website
Before you open the Divi Builder and start creating, make sure these three essentials are already in place. This guide jumps straight into the Divi website setup process, so we’re assuming the basics are ready.
1. A Domain
Your domain is your website’s address on the internet (for example, yourbrand.com). For the DiVi site, we recommend Namecheap for the domain as it offers affordable (.com starts with only $6.79/yr) domain extensions.
Choose a domain name that’s short, easy to remember, and clearly represents your business or purpose. If possible, stick to a .com or a relevant country extension for better trust and branding.
2. Reliable Hosting
Hosting is where your website lives. In case of hosting for a DiVi site, we recommend Hostinger as one of the fastest and reliable hosting (starts from $12.99/m).
Since Divi is a visual, feature-rich theme, you need a hosting provider that offers good performance, sufficient PHP memory, and solid WordPress support. While choosing hosting plans, pick based on your site (blogging, ecommerce, etc).
3. WordPress Installed
Divi does not replace WordPress, it runs on top of it. So, after purchasing domain and hosting, install WordPress before activating the Divi theme. Most hosting providers offer one-click WordPress installation, which makes this step quick. Once you have a domain, hosting, and WordPress ready, you’re good to go.
So, now let’s jump directly into the steps from setting up and building your website with the latest Divi 5.
Step 1: Set Up the Divi Theme on WordPress
Divi website building journeys actually begin with installing and activating the DiVi theme on your site.
Before install, you’ve to first download the DiVi theme from Elegant Themes. Simply go to Elemgantthemes.com and from the members area download DiVi 5.
Once you download the latest DiVi 5, simply install the theme builder.
To Install and activate the Divi Theme,
- Go to Appearance > Themes in your WordPress dashboard.
- Click Add New, then select Upload Theme.
- Upload the Divi theme ZIP file and click Install Now.
- Once the installation is complete, click Activate to set Divi as your active theme.
After activating Divi 5, you must authenticate the Divi theme using your Elegant Themes API key to receive all the theme updates and access official customer support.
To authenticate the Divi theme:
- Go to WordPress Dashboard > Divi >> Theme Options >> Updates
- Enter your Elegant Themes API Key (from the Elegant Themes Members Area)
- Click Save Changes

Once authenticated, Divi will automatically send updates and support access to keep your site secure and compatible with future releases.
When Divi 5 is on your dashboard, take a moment before moving into the actual build. At this stage, it’s important to be clear about what type of site you’re creating, because this determines whether you need a Divi child theme or not.
- No child theme needed: If your site is mostly design-driven like using the Divi Visual Builder for layouts, colors, typography, and even some custom CSS through Divi’s settings, you can move forward without a child theme. Divi handles this workflow very well.
- Child theme recommended: If you’ll add custom functionality like PHP snippets, hooks, filters, or modify how Divi works behind the scenes, set up a child theme before you begin to keep your customization safe when Divi updates.
For child themes on your site, we recommend Molti (blogging site), DiViCommerce (for ecommerce sites) and they are the most popular and top rated themes on the Elegant themes marketplace.
To use a child theme on DiVi, simply upload and activate it from Appearance > Themes on your dashboard, then continue configuring your site with Divi.
Set up DiVi Builder as Plugin on any existing Theme
If you’re already using another theme and don’t want to change the theme, you can still create your pages or posts using DiVi 5 using the DiVi Builder plugin. This plugin is especially built to create professional pages using DiVi templates and functions on any theme.
To use the DiVi builder plugin on any current theme, download it from the same members area of Elegentthemes.com where you download the DiVi 5 theme. Then, go to Plugins > Add Plugin > Upload Plugin. Now, simply upload the downloaded zip plugin there and activate the plugin on your WordPress.
Note: And, if you are planning to create and design your pages with DiVi on your existing theme, then skip the steps (1,2, 3) and directly jump into step 4.
Well, now move on to the DiVi theme configuration process.
Step 2: Configure Divi Global Settings
In this step, we’ll set up the basic site settings and global design settings (font, color, typography, spacing) for our DiVi site.
Now, you’ll have a DiVi tab on the right panel of your dashboard and, with a new DiVi 5 interface like below:

Note: Right now, we’ve zero pages, posts and templates built with DiVi on our site. If you’ve already a site builded by previous DiVi versions like DiVi 4, you can simply migrate your site to DiVi 5 with just one click without losing any pages or posts.
Inside Divi > Theme Options, you’ll find 8 configuration tabs that control your site’s core settings:
- General: Set your logo, colors, fonts, social links, and basic performance options.
- Navigation: Manage menus, dropdown behavior, and page/category links.
- Builder: Configure post type integration and advanced builder settings.
- Layout: Control how pages, posts, and sidebars are displayed.
- Ads: Manage ad placements if you plan to monetize your site.
- SEO: Adjust basic SEO settings for your homepage, posts, and archives.
- Integration: Add tracking codes and third-party scripts.
- Updates: Connect your account and manage theme updates.


You don’t have to do many modifications as almost everything is set by default. Now, after the basic configuration, let’s set up the global design settings (typography, color, font and spacing) for our DiVi site.
To configure the global settings, first, we’ll customize all the global variables for each parameter and then, set the configured settings as module presets to apply them for all future contents.
Configure Global Typography Variables
In these settings, we define how our headings and body text scale across different screen sizes from desktop to mobile.
To Configure DiVi 5 global typography
- Go to Pages > Use DiVi Builder
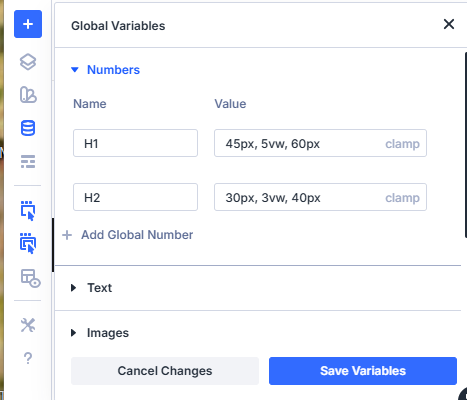
- Click on the Variable Manager > Numbers > Add Global Number
- Name each variable based on its role (H1, H2, H3, Body Text)
- Choose the appropriate unit (clamp or px)
- Save variables
For headings, choose clamp and for body texts, choose px. Because, when you use clamp for DiVi headings, you don’t need to use different fonts for mobiles or other small devices.
For this project, I’m using the following typography values:
- H1: clamp(45px, 5vw, 60px)
- H2: clamp(30px, 3vw, 40px)
- H3: 26px
- Body Text: 1px
In a clamp value like (45px, 5vw, 60px), each parameter controls how your font size behaves on different screen sizes.
- 45px is the Minimum Size (for small screen)
- 5vm is the % of the browser width
- 60px is the Maximum Size (for large screen)
Tip: Always test clamp values on mobile and large screens.
Configure Global Color Variables
Next, move to the Colors section and create your core brand palette. You’ll usually need one main brand color, one strong heading color, one readable body color, and one interaction color for hover states.
To configure the global colors for DiVi 5:
- Go to the Variable Manager >Colors
- Name each color based on usage (Primary, Secondary, Body, Heading)
- Enter your chosen color code
- Add new global color like button/link (if needed)
- Save variables
For this site, I’m using the below color palette:
- Primary Color: #000000
- Secondary Color: #5D5D5D
- Body Text Color: #000000
- Heading Text Color: #000000
- Button color: #19F5A1 (new added)
Tip: Try to limit your main palette to 3-5 global colors to maintain better branding consistency without messing up the design.
Configure Global Font Variables
Now, open the Fonts section where headings should be strong and distinctive and body text prioritize readability. Using two complementary fonts is usually more than enough.
To Configure DiVi 5 global font
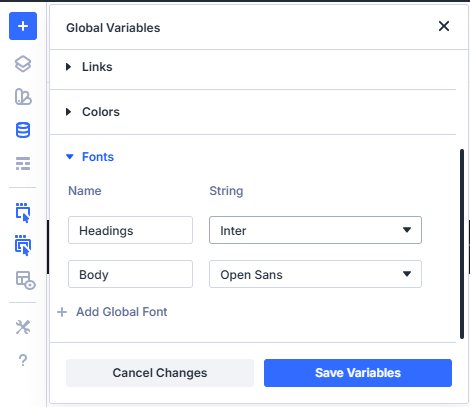
- Go to the Variable Manager > Font
- Set one font for Headings
- Set one font for Body Text
- Save variables
For this site’s font, I’m using:
- Headings Font: Inter
- Body Font: Open Sans
Apply Globals to Module Presets
Once your variables are ready, connect them to Divi’s default modules to apply the custom variables automatically for every new element of your design system.
To configure the DiVi 5’s text Module Preset with custom font, typography, color, spacing;
- Add a text module (if needed)
- Open Preset Selector
- Hover over Text Default Preset
- Click the settings icon
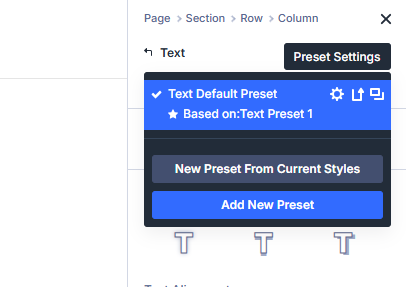
When the background turns dark, you’re editing the default preset. Here, simply connect each element to the corresponding global variables.
To apply global variables as presets;
- Select the design tab > Heading text
- Hit H1 and set the font and font weight
- Set the text size to global H1 variables
- Apply line height 1.1
- Save Preset

Repeat the same process for others headings and body text. Again, you can customize the preset for background colors including sections from this DiVi preset design tab.
From now on, every module will be in these custom settings automatically.
Configure Default Row Spacing
Next, optimize how wide your content appears for different screens.
To configure row spacing,
- Go to Design tab > Sizing.
- Adjust width and max width to balance readability and screen usage.
For this site, I’m using:
- Width: 95%
- Max Width: 1280px
This row width keeps content flexible on small screens and balanced on desktops.
Well, the global settings are done, now, let’s create website pages.
Step 3: Create Necessary Pages
Now, it’s time to start building your actual website pages.
First, we’ll build the necessary pages for our site and then the navigation menu along with the header and footer of the pages.
Create a New Page on DiVi
The pages of your site depend on your site niche. For example, if this is a service site, then the pages will be home, services, resources, about us, pricing, etc. Again, if it’s a clothing ecommerce site, the pages will be cart, checkout, shop, etc.
So, based on your site’s demand, decide the pages. You can take help from AI to guide you what pages you need for your particular site.
Now, with DiVi 5, you can create pages in 2 ways.
1. Manually
2. Using DiVi site builder (mostly recommended for beginners & non designers)
Start by creating a new page manually:
- Go to Pages > Add Page
- Enter your page title (Home, About, Services, Contact, etc.)
- Hit Publish
This way, create all the pages you need for your site.
To create pages using DiVi site builder;
- Go to your DiVi > Dashboard on your site
- From “DiVi Quick Sites” section, click on the “Generate A New Site”
- Here, select one option
1. Use Pre-made starter site
2. Generate your site with AI
Note: In the pre-made starter site builder, you get draft site samples and you can choose one that aligns with your niche and then customize the contents. With the generate with AI option, you simply describe your site details and AI will build necessary pages within minutes according to your site demand with a menu as well.
For now, we’re going with an AI site builder for our business site. Once completed, Divi automatically create pages for our site:
- Homepage
- Services page
- About page
- Contact page
- Strategy page
- CGI pages
Our full site structure will be ready instantly. You’ll also notice Theme Templates beside to control:
- Global Header
- Global Footer
- Post Layouts
Any changes made here affect all related pages. For example, your header and footer usually appear on almost every page. So if you change them here, those changes will automatically apply everywhere. The same goes for post layouts and archive pages.

Step 4: Create DiVi Header, Footer Menu
Now, let’s create a header, footer and navigation menu.
To create DiVi global header,
- Go to Dashboard > Divi > Theme Builder > Add Global Header
- From here, you can either build a new header from scratch or import one from the library. For full customization, building from scratch is usually the best option.
- Most global headers include the following elements:
- A logo
- A navigation menu
- One or two action buttons
- In the header, there is one long row. So, add a row with multiple columns from the DiVi module to create a well-structured menu layout.
- Then, insert an Image module to upload and display your website logo.
- Next, add a Menu module and either select an existing menu or create a new one. To create new navigation menu,
- Go to Appearance > menus
- Name it “main menu” set as primary menu
- Click on Create menu
- Once created, select primary menu from the menu settings
- From the “Add menu items” tab, select all pages and hit “Add to menu”
- Change the order of the pages in the menu
- Click the save menu.

- After setting up the header structure, adjust background colors, text styles, hover effects, spacing, and alignment to match your brand design.
To create DiVi Global footer,
- Go to Divi > Theme Builder > Add Global Footer > Build Global Footer
- For footers, use multi row-column modules based on your content needs.
- A well-designed footer usually contains important information, and branding elements like
- Social media icons
- Contact details
- Terms and privacy links
- Newsletter or signup forms
- Customize each section using the design settings to control colors, typography, spacing, and responsiveness.
Once finished, save your layout and apply the changes in the Theme Builder. Your custom footer will now appear across your entire website.
After finishing both the header and footer, save your layout and apply the changes. Always review the front end to make sure everything remains responsive across different devices.
Note: When you build pages with pre pre-made divi starter site or AI site generator, these header, footer and navigation menu will be already set. You just need to customize them. So, this section is only for if you built your site pages manually.
Step 5: Design Pages with DiVi Visual Builder
Now, after saving your essential pages, the next step is to design their content so it aligns properly with your business goals. At this stage, you’re not just placing text and images on a page, you’re shaping how visitors experience your website.
You can design your web pages in two main ways:
- Design everything manually of the null page
- Design the pre-made page layout templates
Design Pages Manually
Designing pages manually gives you complete creative control. This method is ideal if you want a custom layout that matches your brand exactly and stands out from common templates.
Divi uses a simple layout structure based on three main elements:
- Sections: These are the largest building blocks and act as containers for your content.
- Rows: Rows sit inside sections and define how many columns your layout will have.
- Modules: Modules are where your actual content goes, such as text, images, buttons, sliders, forms, and more.
When you open a page with the Visual Builder, you usually start by adding a section. Inside that section, you insert a row with the column layout you need, and then place modules inside each column.
For example, we’re now designing the homepage for our business website.
Since we’ve already created the global header and footer in the previous steps, we can now focus directly on the main body section of the home page.
- First, we add a full-width section to create the hero area. From the section settings, we open the Background panel and upload a high-quality image that fits the business niche.
- Next, we insert one or two button modules for calls to action. From the Design tab, we match the brand colors and stand out from the background.
- After finishing the hero section, we move down the page and start building the next services sections. For each section, we follow the same workflow: add a new section, choose a suitable row layout, and insert relevant modules based on the content.

While working manually, you can customize every element through the design settings.
Throughout the process, we continuously switch between desktop, tablet, and mobile views. To fine-tune font sizes, spacing, and alignment for all devices.
In the same way, we’ve created our other pages.
Design Divi’s pre-made page layout templates
The easiest and quickest way to design site pages is using DiVi's pre-made page templates. When you generate your website pages using Divi AI or a pre-made (prepaid) template, most of the structure is already built for you.
But we never treat AI-generated or template-based pages as “ready to publish.” They are more like a rough framework that we refine and customize into a real business website.
So, after generating the pages, the first thing we do is take some time to review everything. For designing the pre-generated pages, DiVi 5 comes with a layers tab.
So, to design the entire page, we use
- DiVi 5 layers one by one and
- The design tab to adjust the settings

For example, we’re going to design our service page from the AI generated service-based website using Divi AI and pre-made layout. Here’s how our service page now looks like:

The structure of the services section, call-to-action areas, and contact blocks are all ready. Now our job is to customize it properly and make it ready for publishing.
- The first thing we open the hero section from layers and replace the default background image with a real business-related image. From the Design tab, we adjust the overlay and brightness.
- After that, we rewrite the main headline. Then, edit the short description below it to make sure it highlights the main benefit for visitors.
- Next, we change the button text and link it to the correct contact or booking page. From the Design tab, adjust the button colors and spacing.
- Once the hero section looks good, we scroll down and start working on the next sections one by one. In the services section, we replace all demo text with real service descriptions.
- Throughout this process, we keep using the Layers panel and Wireframe view to understand how each section is structured.
- We also adjust the fonts and colors. Using the Inspector and Variable Manager, we keep the same brand colors and typography across all sections.
Now, the AI-generated or pre-made Divi layout turns into a real business website.
Note:
If you create your entire site manually, but want to create a few pages with pre-built page templates or AI, you can also do it easily. First, go to your manually created page and hit the “+” icon and there will be 3 options like below.

From there choose either a premade layout or build with AI. Then, select or write down your site niche and from the all site pages, select the specific page template and replace with the existing one. Then, simply customize it with the DiVi visual editor.
Step 6: Make the Divi Website Responsive for All Device
Alright, now that we’ve built out all our sections, designed our pages, and added the content, the final step is to make your website look perfect on every device.
Divi 5 has introduced customizable breakpoints, which means you can now target landscape phone views, wider tablets, and even ultra-wide desktop screens.
With Divi 5, there’re 2 ways to get site responsive controls:
- Top bar device icons: Switch quickly between desktop, tablet, and mobile views.
- Settings panel device options: Located at the top of the right side page settings (Content, Design, or Advanced) tabs to edit a specific device view.
By default, the Divi Builder opens in desktop view, but with a single click, you can switch to tablet or mobile view using the icons in the top bar. If you’ve enabled additional breakpoints like phone-wide or tablet-wide, you’ll see those here too.
To make your site fully responsive,
- First, use the clamp function. If you remember, earlier we used dynamic values for font sizes, spacing, and other elements so they automatically adjust based on the screen size.
- To control visibility per device, under the Advanced tab, go to Visibility, where you can check or uncheck options to show or hide rows, sections, or modules on tablet, or mobile.
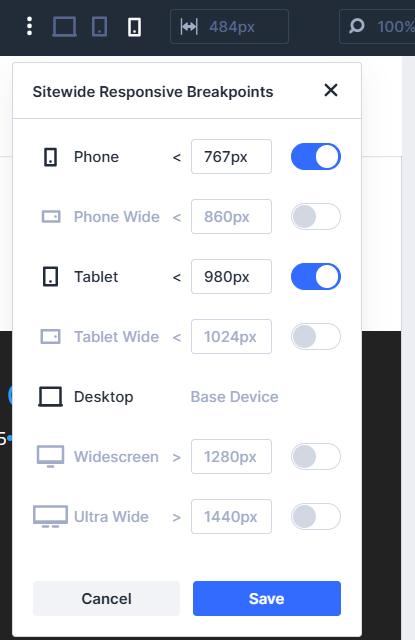
- Finally, configure additional breakpoints for large screens. Open the Sitewide Responsive Panel and enable wider screen options.
Recommended Breakpoints for Divi website:
- Desktop: 1200px or above
- Tablet: up to 980px
- Tablet Wide (Landscape): 981px – 1199px
- Phone (Portrait): up to 860px
- Phone Wide (Landscape): 861px – 980px
- Ultra-Wide Desktop (Optional): 1600px and above
And you're done. Well, you’ve successfully created your fully functional website with DiVi 5.
Warp Up
Hope by now you’ve successfully built your website with Divi 5. In fact, around 40% of users are now using Divi 5 to design their sites.
If you’re creating a brand-new website, the process is above. And even if you’re still on Divi 4 and want to migrate your existing site to Divi 5, you can do it with simple migration.
As your site grows, keep optimizing the structure, pages, and overall layout. Always make your website simple and describe your business in the clearest way possible. Divi 5 takes care of the design and responsiveness, so you can focus on your business.