

Animation helps users notice important information faster, and engage with content in a more natural way.
Creating animation on the WordPress website is now easier than ever. The platform offers plenty of no-code plugins with add basic motion effects and even advanced, time-controlled animations without touching code for almost anyone building a website.
For users who want more pixel-level control, WordPress also supports custom animations using CSS, HTML, and JavaScript libraries like GSAP for performance-focused interactions.
In this guide, we’ll explore two methods (plugin and CSS code) for creating animated websites in WordPress.
So, let’s get started.
Where Do You Need Animations in Your Website?
Before jumping into the steps, you have to clearly understand where you need animations and where you don’t for your site.
When you add random animations, it often does the opposite: too many motion effects slow down performance, while too little motion makes a website feel static.
Below are the areas where animation creates measurable impact on user behavior and overall website experience.
- Hero Section (First Screen Users See)
A subtle entrance animation, moving headline, or background motion immediately signals that the site is modern and active. Studies on user behavior show visitors form first impressions within seconds, and motion helps draw focus to the primary message without requiring extra reading.
- Feature or Service Sections
Scroll-reveal animations work well here because they introduce information step by step instead of overwhelming users with everything at once. Progressive content visibility improves readability and keeps users scrolling longer, which directly increases engagement time.
- CTA Buttons (Call-to-Action Elements)
Hover or micro-interaction animations make buttons feel clickable and responsive. Interaction cues like slight movement or color transitions can noticeably improve click-through rates because users receive immediate visual feedback before taking action.
- Image Galleries or Portfolio Sections
Animated transitions between images help users explore content naturally rather than jumping between static visuals. Smooth motion creates continuity, making browsing feel intuitive and encouraging deeper exploration of products or projects.
- Testimonials and Social Proof Sections
Slider or fade animations keep testimonials dynamic without taking extra space on the page. Rotating feedback maintains attention and increases trust signals, which research consistently links to higher conversion confidence.
Note: If it’s your site's landing page, then you use 3 or 4 animations based on your need at once in a single page. However, if you want to animate your serious product’s funnel page, we recommend not to use more than two (ideally one) for a single page.
Once you understand where animation genuinely improves interaction, the next step is equally important to know where motion doesn’t help.
Where Not to Animate in your Website
Over-animation in functional or content-heavy areas often harms user experience instead of enhancing it.
- Long Text or Blog Content
Readers need focus and readability. Motion around large text sections interrupts concentration and increases cognitive effort, which can shorten reading time and reduce content retention.
- Navigation Menus and Core Controls
Users rely on navigation for speed and predictability. Heavy animation slows interaction and creates friction, especially for returning visitors who already know where they want to go.
- Mobile-Dominant Sections
Mobile users experience performance limitations more quickly. Complex animations can cause lag or stuttering, which users often interpret as poor website quality rather than design choice.
Now, let’s get a quick overview of the best animation types for particular sections of your web page.
Best Animation Types for Each Website Section
If you’re not sure which animation to apply in elements, here’s a quick table of animation styles for each.
| Website Section | Best Animation Type | Trigger |
| Hero Headline | Fade Up + Word Reveal | Page Load |
| Feature Cards | Scroll reveal / Staggered Slide In | Scroll |
| Navigation Links | Underline Expand | Hover |
| Buttons & CTAs | Scale + Shadow Lift | Hover |
| Stats / Numbers | Count Up | Scroll |
| Page Transition | Fade Out / In | Route Change |
| Image Gallery | Zoom on Hover | Hover |
Let’s move into the steps now.
2 Ways to Create an Animated WordPress Website (Plugin And Code)
Here, we’ll feature 2 methods for creating animations on the WordPress site.
- Plugin for no code animation
- CSS and GSAP coding for custom control
Let’s start with plugins.
- Using Animation Plugin (for No Code Beginners)
One of the best things about creating an animated WordPress website is that you don’t need to write code anymore. WordPress offers plenty of animation plugins from beginner-friendly tools to advanced solutions for timeline control, SVG motion, and interaction-based animations.
Here; in this blog, we’ll use an advanced yet easy to use wordpress animation plugin - DiViMotion. With DiViMotion, you can create everything from basic SVG, Lottie animations to advanced GSAP animations with precise timing and motion control.
What You Need Before Starting:
- WordPress Install (Updated)
- DiVi Theme Install (any version, ideally DiVI 5)
Step 1: Install DiViMotion
- Download DiVIMotion from its official site
- Go to WordPress Dashboard > Plugins >> Add Plugin >> Upload Plugin
- Select the downloaded zip file & hit Install
- Activate the plugin


Step 2: Go to Page/Post where to animate
- Go to the page/ post where you want to add animations
- Add your page elements (title, headings, features, CTA, testimonials, etc)
Note: Here, I add a landing page layout from the presets.
Step 3: Add Animations to Page Elements
Now, once your page is ready, let’s start adding animation to page sections/elements.
- How to animate the hero section of your website?
- First, select the hero section of your page and hit on the “settings” icon.
- Go to “Design” tab at the right panel
- Open the “DiViMotion” tab and hit “Add Interaction”


- Choose what interaction you want to add from (scroll, click, hover, page load). This interaction means when your animation will activate.
Here, for the header animation of my hero section, I choose “On Page” as interaction. So, when a user loads the page, my header will be animated.
Note: You can also disable animation for particular devices like mobile or tablet from the pop up for performance issues.
- Now, to add the action of your interaction, hit “Add Action”. The action means what animation (like fade in/zoom, etc) will happen for that particular interaction.
Here, you can set custom actions, use action presets, and select CSS properties to control actions. However, the easiest way to add action is from the “Action presets” where you find 16 different animation types. Here, I choose the “Slide out Right” from the presets.
- Next, choose the page element on what you want that animation with target type and target element.
With DiViMotion, you can choose section, row, module, a single element or even a custom selector for animation. Here’re my selections in the action target settings:
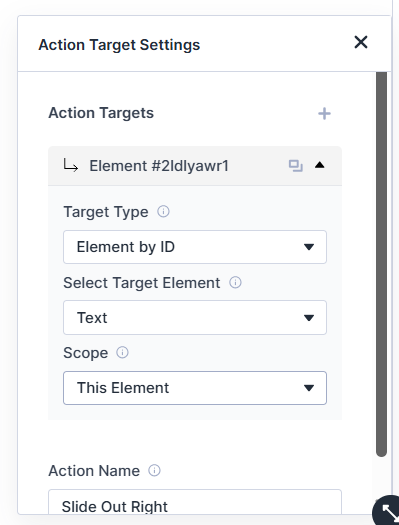
Note: See the layout section while choosing the “Select Target Element” and choose the element according to the layout serial.
- Finally, choose the animation duration, opacity, transformation from the right panel. And, your hero section header slide out animation is done.
- Now, for the button of the hero section, hit on “Add Action” again and repeat the same process of adding action.


Just here, choose the button as the Element and add corresponding action. Here, for button in the hero section, here’re my selections:

Also, adjust the duration, opacity, transformation from the right panel.
Note: Here, the button and header animation, both will trigger for the same “page load” interaction. If you want, you can add separate interaction for both actions. For example, text slide right for page load and button bounce for click.
Your Hero panel is animated. Now, animate the feature section.
- How to animate the feature section of your website?
- First, select the features row and hit the “settings icon”.
- Go to Design tab > DiViMotion and add interaction
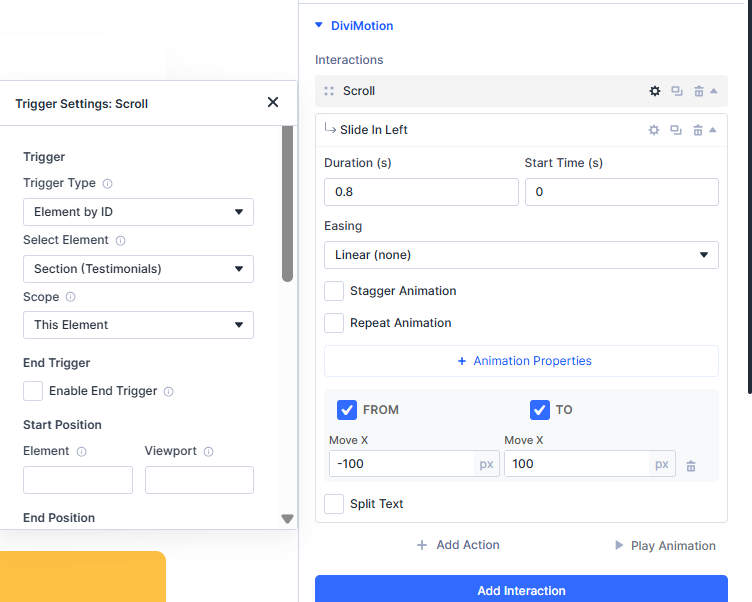
Here, I choose scroll as interaction and the other target settings are like below:

Note: As there are a total of 6 features of my webpage, I select “siblings” as scope to animate all the features at once and keep the other settings by default.
- Now, “add action” for the animation.
For page features, I go with “slide in left” from the action presets and choose “stagger animation” . And for Easing, I choose Linear (none).
Note: Easing defines the acceleration and deceleration of an animation during its movement. Easing appears whenever an animation transitions between two positions, sizes, or states. With DiVimotion, you’re getting 25+ easing modes.
Now,the further settings are like below:
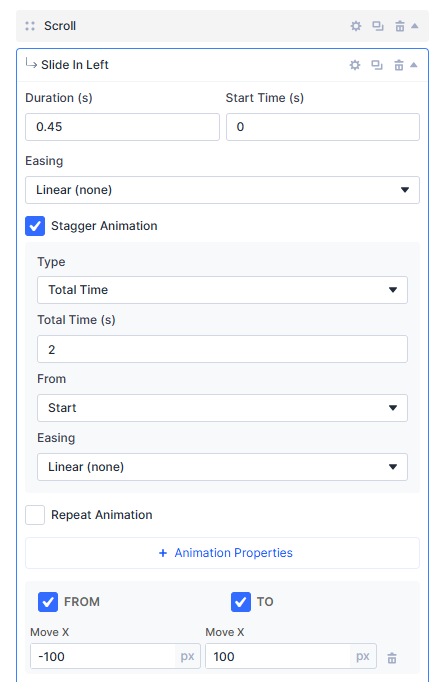
- Then, adjust slide transformation and start/end duration of the slide in animation for your features.
- How to animate the image gallery of your webpage?
Now, let’s animate the image gallery or serial lookalike elements of the page.
- Select the images section and hit the “settings icon”.
- Go to Design tab > DiViMotion and add interaction
Here, for the image animation, I choose “scroll” as interaction and the animation will play when scroll and stop once passed. And, I choose siblings because I want all the images animated within the same interaction.
Here’re my interaction settings:

- Add action to image animation against the scroll.
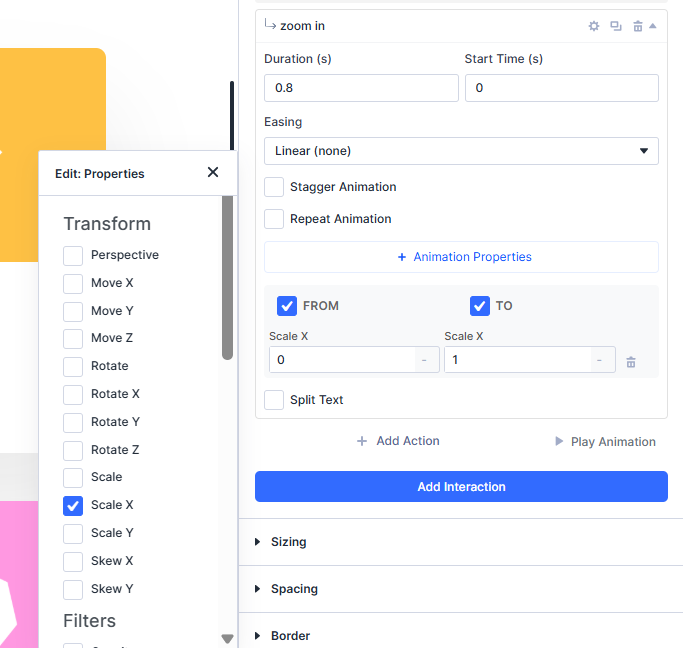
For the images, I want to add “zoom in” animation. As zoom in isn’t in the action presets, I choose “custom action”.
To add custom animation, simply choose “custom action” from the interactions and select the target settings. You can also name it to adjust further if needed. Then, set the animation duration, transformation as you want.

- Now, adjust the zooming duration and add zoom scale.
Here, for zoom in, go to “Add properties" and from the transform panel, select the “scale x”. Then, set the zooming scale as you want.
My settings are like below:
- Add another action in the same way from the other image gallery rows.
- How to add animations for the CTA section of your site?
- Select the entire CTA section and hit the “settings icon”.
- Go to Design tab > DiViMotion and add interaction
Here, I mainly animate the CTA button. So, I choose “scroll” as interaction.

- Then, choose action for the CTA button scroll.
Here, I choose "rotate in” as the action for the CTA animation.
- How to add animation in the testimonials of your site?
- Choose the testimonial section and hit the “settings icon”.
- Go to Design tab > DiViMotion and add interaction
The testimonials are generally arranged in one row and multiple columns. I want to create here when one particular testimonial is clicked, it will zoom in.
So, for testimonial interaction, I choose “Click”. Here’re the settings:
- Then, choose an action for testimonial animation.
Here, I select “slide in left” animation from the action presets.
- Set the duration, transform scale as you need.
However, try not to scale too high or too low. You can see the settings I use in the image.
Well, now, we added the major animations in our landing page. I try to keep the animations minimum so that it balances page loading performance and also interacts with users.
So, here’s the final look of the animated page of my site:
Note: There’s no fixed animation for any specific element. You can try out other animation styles as you want. However, we recommend choosing animations that highlight the most important information you want users to notice, without distracting from or overpowering the content itself.
Step 5: Now, Optimize and Test the animation Performance
- Check the animated page in every screen (desktop, mobile, tablet)
After adding all the animations, check the full web page in different screens from desktop, mobile to tablets. If it looks too messy on mobile, disable the animation for that device.
- Test performance after animation to check the impact on page speed
Test your site and page loading speed after adding animations. If the page loads slowly and not properly responding, cut the heavy timing based animations and keep the simple ones.
Step 6: Publish Your Animated Page
When you confirm everything from animation styles to page performance is ok, then simply hit the “Publish” button and live your site.
Note: Using DiViMotion, it becomes easy to animate advanced animation styles with presets and even custom and also maintain the performance as well.
Now, let’s move into the 2nd method of creating animation for WordPress site using coding.
- Using CSS Coding or GSAP Library (for Developers)
In the first method, we created an animated WordPress website using a plugin. That approach works great for beginners because most of the animation settings are handled visually.
Now, in this second method, we’ll create animations using CSS coding and the GSAP library, giving developers full control over motion, timing, and performance. We will manually add animations that work on any WordPress website regardless of theme or page builder.
Let’s go step by step.
Step 1: Open the WordPress Custom CSS Area
- First, log in to your WordPress dashboard.
- Go to: WordPress Dashboard → Appearance → Customize → Additional CSS
This section allows you to add global CSS that applies across your website. Keep this window open because we’ll add animation code here.
Step 2: Find or Add a Class to the Element
- Next, open the page where you want to add animation.
- Edit the page using your editor (Gutenberg,DiVi, or Classic Editor).
- Select the section, column, or element you want to animate.
- Add a custom CSS class name.
Now we can control this element using CSS.
Step 3: Add Animations Using CSS Coding
- Now add the following CSS inside Additional CSS.
.animate-box {
opacity: 0;
transform: translateY(40px);
transition: all 0.6s ease;
}
/* Hover Effect */
.animate-box:hover {
transform: translateY(-10px);
box-shadow: 0 15px 30px rgba(0,0,0,0.15);
}
/* Scroll Reveal Active State */
.animate-box.show {
opacity: 1;
transform: translateY(0);
}
- Now add this small script once using an HTML block or footer area:
With this setup, you’ll get elements smoothly fade and slide into view while scrolling and slightly lift with a shadow on hover.
This is ideal for feature sections, testimonials, and content blocks.
Step 4: Add More Advanced Animation Control Using GSAP
CSS animations are great for simple interactions, but sometimes you need smoother motion and better timing control. That’s where GSAP (GreenSock Animation Platform) comes in.
To add GSAP Library,
- Go to your theme footer or add an HTML block before the closing body tag and paste:
- Add GSAP Animation
For example: GSAP Fade-Up Animation
When the page loads, the element smoothly fades in while moving upward with more natural motion and refined easing compared to standard CSS animation.
Note: What programming language is good for animation?
CSS and Javascript are the best choices for modern website animation. CSS works best for everyday UI interactions, lightweight visual effects like transitions and hover animations, and JavaScript powers advanced, interactive animations using libraries such as GSAP. You can also use HTML to build the structure of the elements you want to animate, but it doesn’t give you that advanced animation style and control.
How to Optimize Your Animation Performance in WordPress?
Now that you’ve created your animated WordPress website, the next important question is — can you safely use those animations on your live website without slowing it down or affecting user experience?
Many websites look impressive during development but start facing real problems after going live. Pages load slower, scrolling feels laggy on mobile devices, and sometimes animations block important content from appearing quickly. This usually happens because animations are added without performance optimization.
Here are the practical ways to keep your animations smooth and lightweight:
- Use Performance-Friendly Animation Properties (Transform & Opacity)
Not all animations impact performance the same way. Animations based on transform (move, scale, rotate) and opacity (fade effects) are handled directly by the browser’s rendering layer, which means they run smoothly without forcing the page layout to recalculate repeatedly.
So, try to avoid animating properties such as width, height, margins, or positioning whenever possible. Because they trigger layout recalculations and can cause lag especially on small screens.
- Reduce Animation Duration and Delay
Long animations may look stylish but often slow down user interaction. A balanced rule is to keep most animations between 0.3s and 0.8s.
Use slightly longer timing only for hero sections or first impressions, and keep functional elements like buttons and menus quick and immediate.
- Optimize Images and Media Inside Animated Areas
Animations become heavier when large images or videos are involved. Every movement forces the browser to redraw those assets, which increases processing load.
So, before animating a section, make sure images are compressed and properly sized. Use modern formats like WebP and avoid uploading oversized visuals just for design flexibility, especially where multiple elements animate at once.
- Disable Animations on Mobile When Needed
Animations that feel smooth on desktop can become slow or jittery on mobile because phones have limited processing power and battery constraints.
Instead of removing animation completely, simplify it for smaller screens. The animation plugin “DiViMotion” we use in this blog, you can easily disable every animation for particular devices.
Once your animations are added and optimized, the final step is testing how they behave in real conditions. A website that feels smooth on your own computer may perform very differently for actual visitors.
How to Check Performance After Animating Websites?
Ok, you create animation following all the best practices. Now, let’s check the performance in real condition.
Here’s the performance overview of our created WordPress animated page on Pingdom platform:

As I used not too heavy animation on my web page, and kept the settings like duration, opacity optimized, the performance score is good.
For an animation website, the site performance remains between 80-90 is considered as a good range to avoid direct impact on page performance and SEO as well.
Warp Up
There are different ways for everyone to get animations on WordPress nowadays. For non-coders, there are plugins; for coders, there’s CSS coding and even the GSAP library.
The real challenge is planning what and where to add animations while keeping your site fast and responsive. With a proper plan, you can choose any method according to your preference.
However, no matter which method you choose, always optimize and test performance before going live.
FAQ
- Does animation slow down WordPress?
No. Animation can affect page speed because it adds extra code, even when using plugins. To avoid performance issues, use animations selectively like on landing pages or key sections where they enhance engagement rather than overwhelm content where users mainly look for information.
- Are animations good for SEO?
Yes, when used in an optimized way. Animations don’t directly boost rankings, but they improve user engagement and reduce bounce rates, which can indirectly help SEO. Avoid excessive or heavy animations that slow down your site, as speed is a core ranking factor.
- Can animations improve conversions?
Absolutely. Thoughtful animations guide user attention, highlight call-to-action buttons, and create an interactive experience. On landing pages, this can increase engagement up to 70% and conversions up to 20% by encouraging users to click, subscribe, or complete forms.